合并 首先需要将lab2的代码与lab3进行合并。前提是lab2的代码已经通过了。
athena% cd ~/6.828/lab
athena% add git
athena% git commit -am 'changes to lab2 after handin'
Created commit 734fab7: changes to lab2 after handin
4 files changed, 42 insertions(+), 9 deletions(-)
athena% git pull
Already up-to-date.
athena% git checkout -b lab3 origin/lab3
Branch lab3 set up to track remote branch refs/remotes/origin/lab3.
Switched to a new branch "lab3"
athena% git merge lab2
Merge made by recursive.
kern/pmap.c | 42 +++++++++++++++++++
1 files changed, 42 insertions(+), 0 deletions(-)
athena%
增加的文件
inc/ env.h Public definitions for user-mode environments
trap.h Public definitions for trap handling
syscall.h Public definitions for system calls from user environments to the kernel
lib.h Public definitions for the user-mode support library
kern/ env.h Kernel-private definitions for user-mode environments
env.c Kernel code implementing user-mode environments
trap.h Kernel-private trap handling definitions
trap.c Trap handling code
trapentry.S Assembly-language trap handler entry-points
syscall.h Kernel-private definitions for system call handling
syscall.c System call implementation code
lib/ Makefrag Makefile fragment to build user-mode library, obj/lib/libjos.a
entry.S Assembly-language entry-point for user environments
libmain.c User-mode library setup code called from entry.S
syscall.c User-mode system call stub functions
console.c User-mode implementations of putchar and getchar, providing console I/O
exit.c User-mode implementation of exit
panic.c User-mode implementation of panic
user/ * Various test programs to check kernel lab 3 code
这里面就是lab3新增加的文件。
进程管理 JOS里面是把进程叫做env。定义是在inc/env.h。内核是用这个数据结构来管理用户的进程。
进程的结构体如下:
struct Env {
struct Trapframe env_tf; // Saved registers
struct Env *env_link; // Next free Env
envid_t env_id; // Unique environment identifier
envid_t env_parent_id; // env_id of this env's parent
enum EnvType env_type; // Indicates special system environments
unsigned env_status; // Status of the environment
uint32_t env_runs; // Number of times environment has run
// Address space
pde_t *env_pgdir; // Kernel virtual address of page dir
};
然后详细介绍了每个字段。
env_tf
env_link
env_id
env_parent_id
env_type
env_status
ENV_FREE
ENV_RUNNABLE
ENV_RUNNING
ENV_NOT_RUNNABLE
ENV_DYING
env_pgdir
这个结构体是由一个链表来管理的。
struct Env *envs = NULL; // All environments
struct Env *curenv = NULL; // The current env
static struct Env *env_free_list; // Free environment list
作业1 Exercise 1. Modify mem_init() in kern/pmap.c to allocate and map the envs array. This array consists of exactly NENV instances of the Env structure allocated much like how you allocated the pages array. Also like the pages array, the memory backing envs should also be mapped user read-only at UENVS (defined in inc/memlayout.h) so user processes can read from this array.
You should run your code and make sure check_kern_pgdir() succeeds.
这里其实就是两个要求。一个是在内核内存区域分配一段区域来保存这个结构体。
//////////////////////////////////////////////////////////////////////
// Make 'envs' point to an array of size 'NENV' of 'struct Env'.
// LAB 3: Your code here.
n = sizeof(struct Env) * NENV;
envs = (struct Env*) boot_alloc(n);
memset(envs, 0, n);
...
//////////////////////////////////////////////////////////////////////
// Map the 'envs' array read-only by the user at linear address UENVS
// (ie. perm = PTE_U | PTE_P).
// Permissions:
// - the new image at UENVS -- kernel R, user R
// - envs itself -- kernel RW, user NONE
// LAB 3: Your code here.
boot_map_region(kern_pgdir, UENVS, PTSIZE, PADDR(envs), PTE_U);
只需要认真读一注释就可以写出来。没有什么难度。
作业2 配置运行环境。这里讲了一些有意思的用法。考虑这种情况。比如内核里面需要包含一个独立的程序。但是内核本身就是一个大的程序。那么如何把这个小程序放到内核里面去。
比如obj/user/这里生成一堆小程序。那么如何把这些程序放到内核程序里面?kern/Makefrag里面。
首先是定义需要生成的binary的文件列表
KERN_BINFILES := user/hello \
user/buggyhello \
user/buggyhello2 \
user/evilhello \
user/testbss \
user/divzero \
user/breakpoint \
user/softint \
user/badsegment \
user/faultread \
user/faultreadkernel \
user/faultwrite \
user/faultwritekernel
KERN_OBJFILES := $(patsubst %.c, $(OBJDIR) /%.o, $(KERN_SRCFILES) )
KERN_OBJFILES := $(patsubst %.S, $(OBJDIR) /%.o, $(KERN_OBJFILES) )
KERN_OBJFILES := $(patsubst $(OBJDIR) /lib/%, $(OBJDIR) /kern/%, $(KERN_OBJFILES) )
KERN_BINFILES := $(patsubst %, $(OBJDIR) /%, $(KERN_BINFILES) )
通过如下这种方式把binary放到kernel中。
# How to build the kernel itself
$(OBJDIR)/kern/kernel: $(KERN_OBJFILES) $(KERN_BINFILES) kern/kernel.ld \
$(OBJDIR)/.vars.KERN_LDFLAGS
@echo + ld $@
$(V)$(LD) -o $@ $(KERN_LDFLAGS) $(KERN_OBJFILES) $(GCC_LIB) -b binary $(KERN_BINFILES)
$(V)$(OBJDUMP) -S $@ > $@.asm
$(V)$(NM) -n $@ > $@.sym
注意后面-b这个参数就是把后面的文件直接加载到kernel里面。由于我们现在没有文件系统,内核就把用户程序一股脑链接到自己身上,在以后有了文件系统就不需要了。但是它给了我们一个便利,我们现在可以直接在内存上运行它。
可执行程序现在是加载到kernel的镜像里面了。可是如果想运行的时候,又如何定位到这些程序呢?
这个时候如果去看obj/kern/kernel.sym,就会发现这里面定义了很多变量。gcc生成的.sym文件里面包含的就是编译器生成的变量表,左边是虚拟地址,右边就是对应的变量。
链接命令
echo @ld -o obj/kern/kernel \
-m elf_i386 \
-T kern/kernel.ld \
-nostdlib \
obj/kern/entry.o \
obj/kern/entrypgdir.o \
obj/kern/init.o \
obj/kern/console.o \
obj/kern/monitor.o \
obj/kern/pmap.o \
obj/kern/env.o \
obj/kern/kclock.o \
obj/kern/printf.o \
obj/kern/trap.o \
obj/kern/trapentry.o \
obj/kern/syscall.o \
obj/kern/kdebug.o \
obj/kern/printfmt.o \
obj/kern/readline.o \
obj/kern/string.o \
/usr/lib/gcc/i686-linux-gnu/4.8/libgcc.a \
-b binary \
obj/user/hello \
obj/user/buggyhello \
obj/user/buggyhello2 \
obj/user/evilhello \
obj/user/testbss \
obj/user/divzero \
obj/user/breakpoint \
obj/user/softint \
obj/user/badsegment \
obj/user/faultread \
obj/user/faultreadkernel \
obj/user/faultwrite \
obj/user/faultwritekernel
f011b356 D _binary_obj_user_hello_start
f0122b88 D _binary_obj_user_buggyhello_start
f0122b88 D _binary_obj_user_hello_end
f012a3bf D _binary_obj_user_buggyhello2_start
f012a3bf D _binary_obj_user_buggyhello_end
f0131c11 D _binary_obj_user_buggyhello2_end
f0131c11 D _binary_obj_user_evilhello_start
f0139447 D _binary_obj_user_evilhello_end
f0139447 D _binary_obj_user_testbss_start
f0140c94 D _binary_obj_user_divzero_start
f0140c94 D _binary_obj_user_testbss_end
f01484dd D _binary_obj_user_breakpoint_start
f01484dd D _binary_obj_user_divzero_end
f014fd14 D _binary_obj_user_breakpoint_end
f014fd14 D _binary_obj_user_softint_start
f0157548 D _binary_obj_user_badsegment_start
f0157548 D _binary_obj_user_softint_end
f015ed7f D _binary_obj_user_badsegment_end
f015ed7f D _binary_obj_user_faultread_start
f01665b5 D _binary_obj_user_faultread_end
f01665b5 D _binary_obj_user_faultreadkernel_start
f016ddf1 D _binary_obj_user_faultreadkernel_end
f016ddf1 D _binary_obj_user_faultwrite_start
f0175628 D _binary_obj_user_faultwrite_end
f0175628 D _binary_obj_user_faultwritekernel_start
f017ce65 D _binary_obj_user_faultwritekernel_end
在内核代码里面就可以通过这些变量的指示来找到相应的程序的内存在哪里。
gcc include binary files
这里我们假设想把一个hello.c文件生成的binary放到main.c生成的main程序里面。操作如下:
编译hello.c
cat <<"EOF" > hello.c
int main (void ) {
return 0 ;
}
EOF
gcc hello.c -o hello
提取binary
gcc hello.c -o hello
objcopy -I binary -O elf32-i386 -B i386 hello hello.o
首先说一下原理。
编译生成hello,这是一个elf格式的完全可以独立运行的格式。
第二句话是将hello这个完整的elf当成一个巨大的char binary[]数组。类似于生成如下汇编代码
.global _b inary_hello_start
.global _b inary_hello_end
.global _b inary_hello_size
_b inary_hello_start:
.db xxxxxx
.db xxxxxx
.db xxxxxx
.db xxxxxx
_b inary_hello_end:
_b inary_hello_size:
.dword x32xxx
其中xxxx部分就是表示hello整个ELF文件的内容。
hello.o就是把这个.asm汇编代码转成object文件。不信用nm -n命令查看一下:
root@debug:/tmp
00000000 D _binary_hello_start
00001c88 D _binary_hello_end
00001c88 A _binary_hello_size
root@debug:/tmp
所以这里需要明白。这里的hello.o与
gcc -c hello.c -o hello.o
是不一样的。这两个有本质的区别。并且比较hello与汇编生成的hello.o两者的大小,
root@debug:/tmp
-rwxr-xr-x 1 root root 7304 4月 24 08:05 hello
-rw-r--r-- 1 root root 7730 4月 24 08:05 hello.o <-- 要大很多
添加
准备main.c如下:
#include <stdio.h>
extern unsigned char _b inary_hello_start;
extern unsigned char _b inary_hello_end;
extern unsigned char _b inary_hello_size;
int main ()
{
unsigned char *pblob = &_b inary_hello_start;
while (pblob < &_b inary_hello_end)
{
printf ("%d: %02X\n" , pblob - &_b inary_hello_start, *pblob);
pblob++;
}
printf ("size: %d\n" , &_b inary_hello_size);
return 0 ;
}
整合到一起
gcc -c main.c -o main.o
gcc main.o hello.o -o test
env_init() 这个函数的作用很简单,就是完成如下功能。
void
env_init (void )
{
memset (envs, 0 , sizeof (envs));
env_free_list = NULL ;
for (int i = NENV - 1 ; i >= 0 ; i--) {
envs[i].env_link = env_free_list;
env_free_list = envs + i;
}
assert(env_free_list == envs);
env_init_percpu();
}
这里犯过的一个错误是
for (uint32_t i = NENV - 1 ; i >= 0 ; i--) {
}
这样操作,实际上是会造成溢出。这个循环也就会一直出问题。
env_setup_vm() 这个函数的功能实际上就是给进程分配页目录表。
static int
env_setup_vm (struct Env *e)
{
int i;
struct PageInfo *p = NULL ;
if (!(p = page_alloc(ALLOC_ZERO)))
return -E_NO_MEM;
e->env_pgdir = page2kva(p);
p->pp_ref++;
memcpy (e->env_pgdir, kern_pgdir, PGSIZE);
e->env_pgdir[PDX(UVPT)] = PADDR(e->env_pgdir) | PTE_P | PTE_U;
return 0 ;
}
注意这里也是像内核一样,把UVPT这块空间映射到了页目录表这里。通过这样一个映射。进程在查看自己的UVPT这个地址得到。
这样可以发现,内核并没有提供一个叫get_pgdir(void **pgdir)这样的一个系统调用给用户进程。linux系统里面,很多信息则是通过/proc, /sysfs这两个文件系统
region_alloc region_alloc函数的功能就是填充va起始的虚拟地址。需要找到长度为len的物理内存地址来填满。lab。并不需要考虑页面不够的情况。
唯一需要处理的就是把地址对齐之后,然后一页一页地开始处理。
static void
region_alloc (struct Env *e, void *va, size_t len)
{
void *v = ROUNDDOWN(va, PGSIZE);
size_t l = ROUNDUP(len, PGSIZE);
for (uint32_t i = 0 ; i < l; i += PGSIZE) {
struct PageInfo *p = page_alloc(0 );
if (!p) {
panic("region_alloc :%e" , -E_NO_MEM);
}
assert(!page_insert(e->env_pgdir, p, v, PTE_U | PTE_W));
v += PGSIZE;
assert(v > va && i < len);
}
}
注意对于溢出的检查和处理。
load_icode load_icode函数本身是用来加载整个程序的。因为程序是ELF格式的。ELF里面提明了需要加到载的段内存地址ph->p_va,要加载的段的长度ph->p_filesz等信息。
static void
load_icode (struct Env *e, uint8_t *binary)
{
struct Elf *ELFHDR = (struct Elf*)binary;
assert(ELFHDR->e_magic == ELF_MAGIC);
struct Proghdr *ph, *eph;
ph = (struct Proghdr *) ((uint8_t *) ELFHDR + ELFHDR->e_phoff);
eph = ph + ELFHDR->e_phnum;
lcr3(PADDR(e->env_pgdir));
for (; ph < eph; ph++) {
if (ph->p_type == ELF_PROG_LOAD) {
region_alloc(e, (void *)(ph->p_va), ph->p_memsz);
uint8_t *src = binary + ph->p_offset;
uint8_t *dst = (uint8_t *)ph->p_va;
memcpy (dst, src, ph->p_filesz);
if (ph->p_filesz < ph->p_memsz) {
memset (dst + ph->p_filesz, 0 , ph->p_memsz - ph->p_filesz);
}
}
}
lcr3(PADDR(kern_pgdir));
e->env_tf.tf_eip = ELFHDR->e_entry;
region_alloc(e, (void *)(USTACKTOP - PGSIZE), PGSIZE);
}
这里唯一需要注意的是:以下这种方式是不工作的。
ph = (struct Proghdr *) ((uint8_t *) ELFHDR + ELFHDR->e_phoff);
eph = ph + ELFHDR->e_phnum;
lcr3(PADDR(e->env_pgdir));
for (; ph < eph; ph++) {
if (ph->p_type == ELF_PROG_LOAD) {
region_alloc(e, (void *)(ph->p_va), ph->p_memsz);
uint8_t *src = binary + ph->p_offset;
uint8_t *dst = page2kva(page_lookup(e->env_pgdir, (void *)(ph->p_va), NULL ));
memcpy (dst, src, ph->p_filesz);
if (ph->p_filesz < ph->p_memsz) {
memset (dst + ph->p_filesz, 0 , ph->p_memsz - ph->p_filesz);
}
}
}
e->env_tf.tf_eip = ELFHDR->e_entry;
首先说一下这种写法的意图。意图就是通过kern_pgdir这个虚拟地址空间把相应的页拷贝过去。
uint8_t *dst = page2kva(page_lookup(e->env_pgdir, (void *)(ph->p_va), NULL ));
这种拷贝方式只对单页面有效的。对于一个段,如果超出两个页,而这个两个页面在物理上并不连续的时候。
此外,一定要注意tf_eip的设置。
env_create
void
env_create (uint8_t *binary, enum EnvType type)
{
struct Env *init_task = NULL ;
assert(!env_alloc(&init_task, 0 ));
init_task->env_parent_id = 0 ;
init_task->env_type = type;
load_icode(init_task, binary);
}
这里就是申请一个进程描述符,然后把相应的代码加载上去。
env_run 调度到用户进程上执行。
void
env_run (struct Env *e)
{
if (curenv && curenv->env_status == ENV_RUNNING) {
curenv->env_status = ENV_RUNNABLE;
}
curenv = e;
curenv->env_status = ENV_RUNNING;
e->env_runs++;
lcr3(PADDR(e->env_pgdir));
env_pop_tf(&(e->env_tf));
}
这里其实就是做了一个非常简单的进程切换。把当前curenv进程切换到要运行的进程e上面。
调用过程。
start (kern/entry.S)
i386_init (kern/init.c)
cons_init
mem_init
env_init
trap_init (still incomplete at this point)
env_create # 建页目录表,加载代码
env_run # 切换上下文
env_pop_tf
注意,这里如果打算直接跑一下make qemu-nox的话。整个OS会不断地重启。hello world打算退出的时候,就会调用sys_exit系统调用。
注意 如果是使用的MIT打补丁的qemu是不会重启的。只是这里没有必要专门为了这么一个实验去
中断号的描述 :id :type :errorCode :info
:0 :Fault :No :Divide Error
:1 :Fault/Trap :No :Debug Exception
:2 :Interrupt :No :NMI Interrupt
:3 :Trap :No :Breakpoint
:4 :Trap :No :Overflow
:5 :Fault :No :Bound Check
:6 :Fault :No :Illegal Opcode
:7 :Fault :No :Device Not available
:8 :Abort :Yes :Double Fault
:10 :Fault :Yes :Invalid TSS
:11 :Fault :Yes :Segment Not Present
:12 :Fault :Yes :Stack Exception
:13 :Fault :Yes :General Protection Fault
:14 :Fault :Yes :Page Fault
:16 :Fault :No :Floating Point Error
:17 :Fault :Yes :Alignment Check
:18 :Abort :No :Machine Check
:19 :Fault :No :Simd Floating Point Error
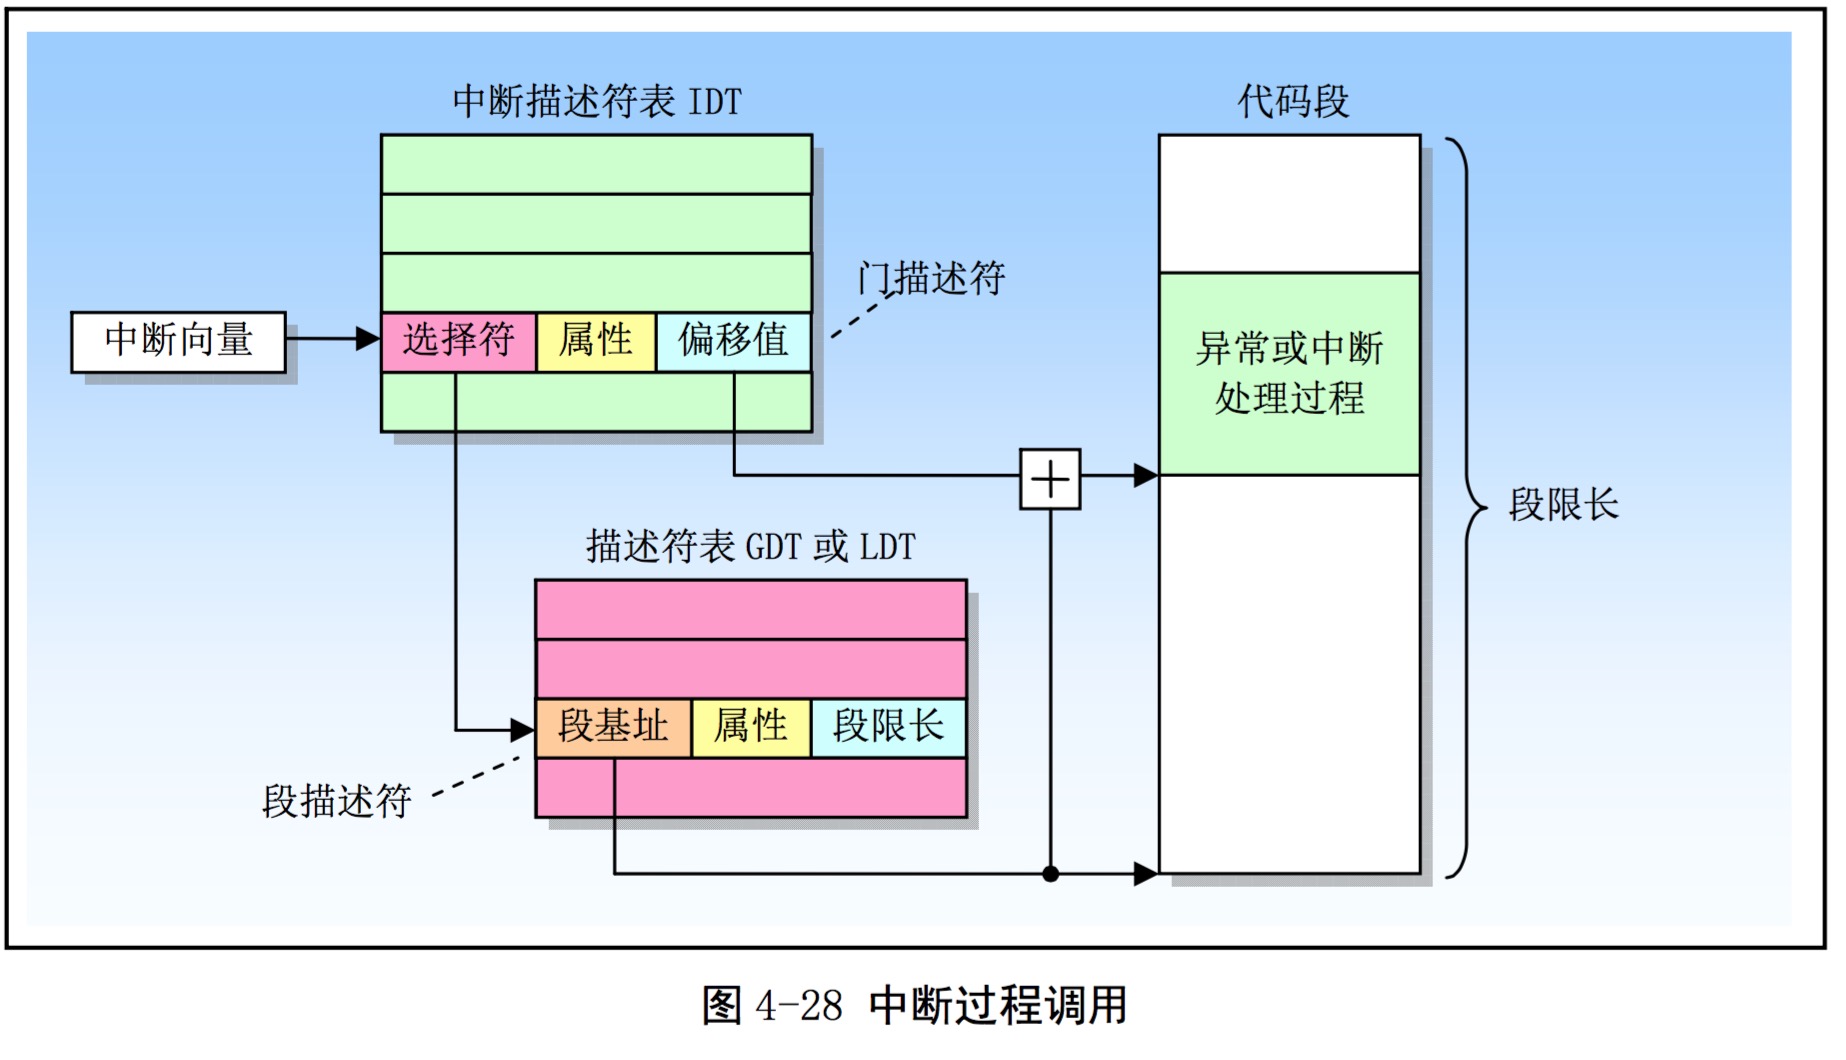
中断向量表 这里需要看一下这个图。
如果对应到源码里面。
* shifted function addresses can't be represented in relocation records.)
*/
struct Gatedesc idt[256 ] = { { 0 } };
struct Pseudodesc idt_pd = {
sizeof (idt) - 1 , (uint32_t ) idt
};
这里的idt就是存放256个中断描述符的地方。只过这个时候还没有把idt加载到CPU上。而在trap_init的时候
void
trap_init (void )
{
extern struct Segdesc gdt[];
void T_DIVIDE_handler ()
void T_DEBUG_handler ()
void T_NMI_handler ()
void T_BRKPT_handler ()
void T_OFLOW_handler ()
void T_BOUND_handler ()
void T_ILLOP_handler ()
void T_DEVICE_handler ()
void T_DBLFLT_handler ()
void T_TSS_handler ()
void T_SEGNP_handler ()
void T_STACK_handler ()
void T_GPFLT_handler ()
void T_PGFLT_handler ()
void T_FPERR_handler ()
void T_ALIGN_handler ()
void T_MCHK_handler ()
void T_SIMDERR_handler ()
void T_SYSCALL_handler ()
SETGATE(idt[T_DIVIDE], 0 , GD_KT, T_DIVIDE_handler, 0 );
SETGATE(idt[T_DEBUG], 0 , GD_KT, T_DEBUG_handler, 0 );
SETGATE(idt[T_NMI], 0 , GD_KT, T_NMI_handler, 0 );
SETGATE(idt[T_BRKPT], 1 , GD_KT, T_BRKPT_handler, 0 );
SETGATE(idt[T_OFLOW], 1 , GD_KT, T_OFLOW_handler, 0 );
SETGATE(idt[T_BOUND], 0 , GD_KT, T_BOUND_handler, 0 );
SETGATE(idt[T_ILLOP], 0 , GD_KT, T_ILLOP_handler, 0 );
SETGATE(idt[T_DEVICE], 0 , GD_KT, T_DEVICE_handler, 0 );
SETGATE(idt[T_DBLFLT], 0 , GD_KT, T_DBLFLT_handler, 0 );
SETGATE(idt[T_TSS], 0 , GD_KT, T_TSS_handler, 0 );
SETGATE(idt[T_SEGNP], 0 , GD_KT, T_SEGNP_handler, 0 );
SETGATE(idt[T_STACK], 0 , GD_KT, T_STACK_handler, 0 );
SETGATE(idt[T_GPFLT], 0 , GD_KT, T_GPFLT_handler, 0 );
SETGATE(idt[T_PGFLT], 0 , GD_KT, T_PGFLT_handler, 0 );
SETGATE(idt[T_FPERR], 0 , GD_KT, T_FPERR_handler, 0 );
SETGATE(idt[T_ALIGN], 0 , GD_KT, T_ALIGN_handler, 0 );
SETGATE(idt[T_MCHK], 0 , GD_KT, T_MCHK_handler, 0 );
SETGATE(idt[T_SIMDERR], 0 , GD_KT, T_SIMDERR_handler, 0 );
SETGATE(idt[T_SYSCALL], 1 , GD_KT, T_SYSCALL_handler, 3 );
trap_init_percpu();
}
void
trap_init_percpu (void )
{
ts.ts_esp0 = KSTACKTOP;
ts.ts_ss0 = GD_KD;
ts.ts_iomb = sizeof (struct Taskstate);
gdt[GD_TSS0 >> 3 ] = SEG16(STS_T32A, (uint32_t ) (&ts),
sizeof (struct Taskstate) - 1 , 0 );
gdt[GD_TSS0 >> 3 ].sd_s = 0 ;
ltr(GD_TSS0);
lidt(&idt_pd);
}
这里可能的面临的一个问题是,这些中断处理程序是在哪里定义的呢?那么接下来写trapentry.S。
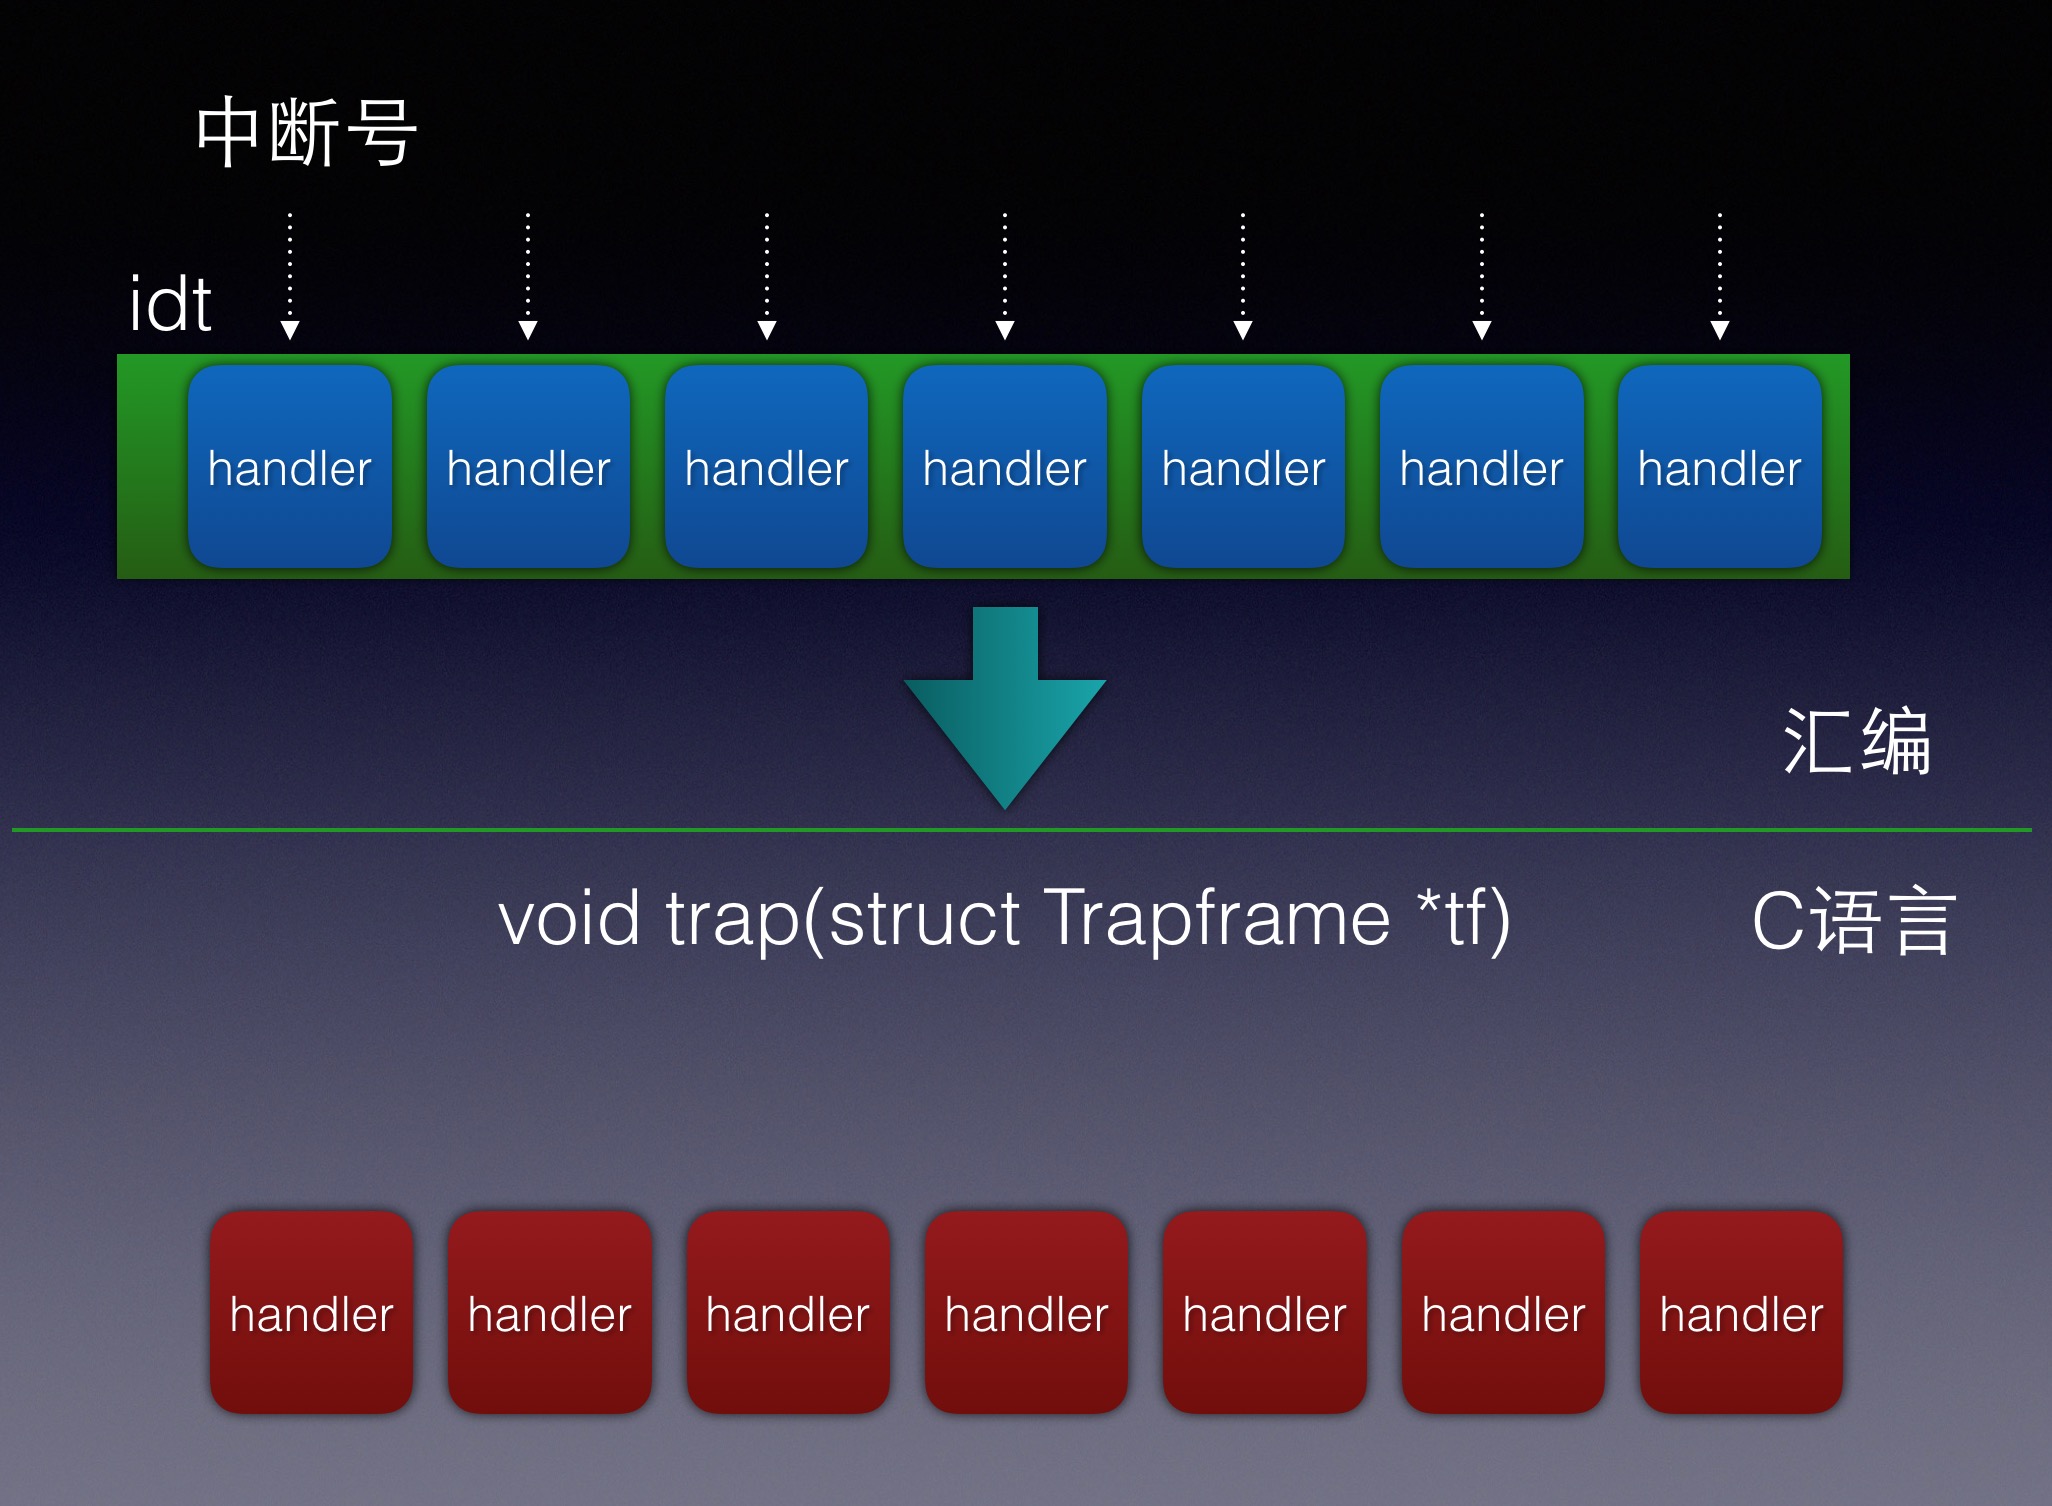
trapentry.S 整个中断的调用过程如下图所示:
因此,在写代码的时候,需要先写trapentry.S里面的代码。首先读一下代码
/* TRAPHANDLER defines a globally-visible function for handling a trap.
* It pushes a trap number onto the stack, then jumps to _alltraps.
* Use TRAPHANDLER for traps where the CPU automatically pushes an error code.
*
* You shouldn't call a TRAPHANDLER function from C, but you may
* need to _declare_ one in C (for instance, to get a function pointer
* during IDT setup). You can declare the function with
* void NAME();
* where NAME is the argument passed to TRAPHANDLER.
*/
#define TRAPHANDLER(name, num) \
.globl name; /* define global symbol for 'name' */ \
.type name, @function; /* symbol type is function */ \
.align 2; /* align function definition */ \
name: /* function starts here */ \
pushl $(num); \
jmp _alltraps
/* Use TRAPHANDLER_NOEC for traps where the CPU doesn't push an error code.
* It pushes a 0 in place of the error code, so the trap frame has the same
* format in either case.
*/
#define TRAPHANDLER_NOEC(name, num) \
.globl name; \
.type name, @function; \
.align 2; \
name: \
pushl $0; \
pushl $(num); \
jmp _alltraps
这是因为x86的CPU硬件在遇到中断的时候,会进行自动化的处理。
1. 如果是在ring 0 ,那么直接使用当前的ss/esp
2. 如果是在ring 3 , 那么使用当前tss段里面的ss0/esp0。然后开始压栈
无错误码时压栈。
+--------------------+ KSTACKTOP
| 0x00000 | old SS | " - 4
| old ESP | " - 8
| old EFLAGS | " - 12
| 0x00000 | old CS | " - 16
| old EIP | " - 20 <---- ESP
+--------------------+
对于这种情况。TRAPHANDLER_NOEC会额外地
有错误码时压栈:
+--------------------+ KSTACKTOP
| 0x00000 | old SS | " - 4
| old ESP | " - 8
| old EFLAGS | " - 12
| 0x00000 | old CS | " - 16
| old EIP | " - 20
| error code | " - 24 <---- ESP
+--------------------+
因此,当压完栈之后。栈中的元素就是对应下面罗列的元素。由此可知,硬件栈是从上往下增长,一个结构体,代码最下面的元素是最先入栈。
如果把结构体里面所有的元素放在从左往右的一行上。压栈顺序与函数入栈的顺序也是一样的。即从右往左 入栈。
struct Trapframe {
.....
uint32_t tf_trapno;
uint32_t tf_err;
uintptr_t tf_eip;
uint16_t tf_cs;
uint16_t tf_padding3;
uint32_t tf_eflags;
uintptr_t tf_esp;
uint16_t tf_ss;
uint16_t tf_padding4;
} __ attribute__((packed));
这些元素,有些是硬件压入栈的。有些是两个宏压入栈的。
* Lab 3: Your code here for generating entry points for the different traps.
*/
TRAPHANDLER_NOEC(T_DIVIDE_handler, T_DIVIDE)
TRAPHANDLER_NOEC(T_DEBUG_handler, T_DEBUG)
TRAPHANDLER_NOEC(T_NMI_handler, T_NMI)
TRAPHANDLER_NOEC(T_BRKPT_handler, T_BRKPT)
TRAPHANDLER_NOEC(T_OFLOW_handler, T_OFLOW)
TRAPHANDLER_NOEC(T_BOUND_handler, T_BOUND)
TRAPHANDLER_NOEC(T_ILLOP_handler, T_ILLOP)
TRAPHANDLER_NOEC(T_DEVICE_handler, T_DEVICE)
TRAPHANDLER(T_DBLFLT_handler, T_DBLFLT)
TRAPHANDLER(T_TSS_handler, T_TSS)
TRAPHANDLER(T_SEGNP_handler, T_SEGNP)
TRAPHANDLER(T_STACK_handler, T_STACK)
TRAPHANDLER(T_GPFLT_handler, T_GPFLT)
TRAPHANDLER(T_PGFLT_handler, T_PGFLT)
TRAPHANDLER_NOEC(T_FPERR_handler, T_FPERR)
TRAPHANDLER(T_ALIGN_handler, T_ALIGN)
TRAPHANDLER_NOEC(T_MCHK_handler, T_MCHK)
TRAPHANDLER_NOEC(T_SIMDERR_handler, T_SIMDERR)
TRAPHANDLER_NOEC(T_SYSCALL_handler, T_SYSCALL)
在写这里的时候,一定不要忘了系统调用号T_SYSCALL的设置。
统一的中断处理 但是struct Trapframe里面还有好多其他元素。后面还是需要接着再入栈。
/*
* 注意压栈的顺序是从struct Trapframe的底部往上压
* 看一下前面的宏,已经压参数,压到了tf_trapno这里了。
* 注意:使用pusha指令
*/
_alltraps:
/*
* 注意这里直接用了pushl前面自动补0
* 如果要严格的对应
* - pushw $0
* - pushw %ds
* - pushw $0
* - pushw %es
*/
pushl %ds
pushl %es
pushal
/*
* 这里是因为后面要调用trap函数
* 1.
* trap函数的定义是trap(struct Trapframe *tf)
* 这里还有一个指针
* 这个时候压入pushl %esp这个寄存器的内容。
* 也就刚好是真正的指向struct Trapframe这个object的起始地址
* 2.
* 如果trap函数的定义是trap(struct Trapframe tfObject)
* 那么这个pushl %esp是没有必要压进去的
*/
pushl %esp
/*然后指向内核数据段
* 硬件上中断门描述符进来的时候
* 已经把CPU设置成了GD_KT也就是内核代码段。
* 这个是硬件操作
*/
movw $GD_KD, %ax
movw %ax, %ds
movw %ax, %es
call trap
/* 操作完成之后,
* 没有必要要按照反方向的顺序返回
* 因为trap函数最终会走到env_pop_tf()这个函数
* movl $tf, %esp
* popal
* popl %es
* popl %ds
* addl $0x08, %esp
* iret
*/
注意上面代码中的注释。
小结 这个时候可以总结一下了。
1. 发生中断或者trap,从ldtr里面找到ldt。
2. 根据中断号找到这一项,即ldt[中断号]
3. 根据ldt[中断号] == SETGATE(idt[T_MCHK], 0, GD_KT, T_MCHK_handler, 0);
取出当时设置的中断处理函数
4. 跳转到中断函数
5. 中断处理函数再跳转到trap函数。
6. trap函数再根据tf->trap_no中断号来决定分发给哪个函数。
也就是如下图:
trap_dispatch trap函数接下来就是调用trap_dispatch分发了中断。所以函数的具体实现还得转到trap_dispatch这个函数里面来。
Exercise 5. Modify trap_dispatch() to dispatch page fault exceptions to page_fault_handler().faultread, faultreadkernel,faultwrite, and faultwritekernel tests. If any of them don’t work, figure out why andmake run-xmake run-x-nox. For instance, make run-hello-nox runs the hello user program.
这里还是比较简单。注意 这里只需要转到page_fault_handler()就可以了。并不需要在page_fault_handler()里面做任何真正的处理。
int ret = 0 ;
switch (tf->tf_trapno) {
case T_PGFLT:
page_fault_handler(tf);
return ;
default :
break ;
}
同样,对于断点来说,也是需要再加一个case就可了。
case T_BRKPT:
monitor(tf);
return ;
但是需要注意,在以前写代码的时候,设置SETGATE的时候,需要设置dpl=3。
SETGATE(idt[T_BRKPT], 1, GD_KT, T_BRKPT_handler, 3);
系统调用 在开始写之前,需要考虑客户端是如何调用的。inc/syscall.h
enum {
SYS_cputs = 0 ,
SYS_cgetc,
SYS_getenvid,
SYS_env_destroy,
NSYSCALLS
};
这里定义了系统调用的数目。客户端的使用代码位于lib/syscall.c
static inline int32_t
syscall(int num, int check, uint32_t a1, uint32_t a2, uint32_t a3, uint32_t a4, uint32_t a5)
{
int32_t ret;
// Generic system call: pass system call number in AX,
// up to five parameters in DX, CX, BX, DI, SI.
// Interrupt kernel with T_SYSCALL.
//
// The "volatile" tells the assembler not to optimize
// this instruction away just because we don't use the
// return value.
//
// The last clause tells the assembler that this can
// potentially change the condition codes and arbitrary
// memory locations.
asm volatile("int %1\n" // 这里指向num
: "=a" (ret) // 返回值从eax 设置到 ret里面。
: "i" (T_SYSCALL), // 这里随意选择一个寄存器
"a" (num), // 把想要调用的中断号给eax
"d" (a1), // 第一个参数给edx
"c" (a2), // 第二个参数给ecx
"b" (a3), // 第三个参数给ebx
"D" (a4), // 第四个参数给edi
"S" (a5) // 第五个参数给esi
: "cc", "memory");
// 如果我们的指令可以修改条件码寄存器(cc),我们必须将 "cc" 添加进修饰寄存器列表。
// 如果我们的指令以不可预测的方式修改了内存,那么需要将 "memory" 添加进修饰寄存器列表。
if(check && ret > 0)
panic("syscall %d returned %d (> 0)", num, ret);
return ret;
}
所以在写底层OS的实现的时候,也一定要注意到这么一点。
case T_SYSCALL:
if (tf->tf_regs.reg_eax >= NSYSCALLS) return -E_INVAL;
tf->tf_regs.reg_eax = syscall(
tf->tf_regs.reg_eax,
tf->tf_regs.reg_edx,
tf->tf_regs.reg_ecx,
tf->tf_regs.reg_ebx,
tf->tf_regs.reg_edi,
tf->tf_regs.reg_esi
);
return ;
系统要实现的系统调用也没有太多。也就是enum那里列出来的那几个。所以在实现的时候,只需要通过case语句把系统调用引导过去就可以了。
int32_t
syscall(uint32_t syscallno, uint32_t a1, uint32_t a2, uint32_t a3, uint32_t a4, uint32_t a5)
{
switch (syscallno) {
case SYS_cputs:
sys_cputs((char *)a1, (size_t )a2);
case SYS_cgetc:
return sys_cgetc();
case SYS_getenvid:
assert(curenv);
return sys_getenvid();
case SYS_env_destroy:
assert(curenv);
return sys_env_destroy(sys_getenvid());
default :
return -E_INVAL;
}
}
内存的检测 接下来就会看到SYS_cputs函数里面是需要检查一下用户权限是否可以访问内存区域。
static void
sys_cputs (const char *s, size_t len)
{
user_mem_assert(curenv, s, len, PTE_P|PTE_U);
cprintf("%.*s" , len, s);
}
而这里user_mem_assert是需要在kern/pmap.c里面去实现的。代码跳转过去,会发现代码里user_mem_check()。
首先给出一种低效的版本,比如:
int
user_mem_check(struct Env *env, const void *va, size_t len, int perm)
{
// LAB 3: Your code here.
// LAB 3: DONE
user_mem_check_addr = 0;
for (const void *b = va; (b - va) < len; b++) {
user_mem_check_addr = (size_t)b < ULIM ? 0 : (size_t)b;
if (!user_mem_check_addr) {
pte_t *pte = pgdir_walk(env->env_pgdir, b, 0);
if (!pte || !(*pte & (PTE_P|perm|PTE_U))) {
user_mem_check_addr = (size_t)b;
}
}
if (user_mem_check_addr) return -E_FAULT;
}
return 0;
}
注意,为了防止溢出,在条件判断的时候,最好是使用b-va < len这种格式。10 ~ 4097。在检查完地址10之后。实际上是可以跳到下
b = 当前地址
// 要找到下一个页面对齐的地址
b = ROUNDDOWN(b, PGSIZE) + PGSIZE
那么代码就可以很容易地精简如下了。
int
user_mem_check (struct Env *env, const void *va, size_t len, int perm)
{
user_mem_check_addr = 0 ;
for (const void *b = va; (b - va) < len; b += PGSIZE) {
user_mem_check_addr = (size_t )b < ULIM ? 0 : (size_t )b;
if (!user_mem_check_addr) {
pte_t *pte = pgdir_walk(env->env_pgdir, b, 0 );
if (!pte || !(*pte & (PTE_P|perm|PTE_U))) {
user_mem_check_addr = (size_t )b;
}
}
if (user_mem_check_addr) return -E_FAULT;
b = ROUNDDOWN(b, PGSIZE);
}
return 0 ;
}