课程进度
三次作业
- Assignment: HW: Boot xv6
- Assignment: HW: shell
- Assignment: Lab 1: C, Assembly, Tools, and Bootstrapping
Boot xv6
这里只介绍第一次作业的情况,后面章节再介绍第一课的后面的作业。
- 实验环境
Ubuntu:14.04
- xv6 & qemu
准备环境
首先运行apt-get update升级系统包,然后再安装必须的一些包。比如:
注意:
这里为了省事,都是使用的是root用户在操作。普通用户可以通过sudo -s切换到root用户。
apt-get install -y git apt-get install -y qemu-kvm apt-get install -y gdb apt-get install -y build-essential cd /opt/ git clone git://github.com/mit-pdos/xv6-public.git
|
编译xv6
cd /opt/ cd xv6-public make
|
运行gdb
这里需要开两个termial,一个用来运行qemu进程作为gdb-server,另外一个用来作为gdb调试端。
qemu/gdb-server
cd /opt/xv6-public root@7c8d7a387d68:/opt/xv6-public sed "s/localhost:1234/localhost:25000/" < .gdbinit.tmpl > .gdbinit *** Now run 'gdb'. qemu-system-i386 -nographic -drive file=fs.img,index=1,media=disk,format=raw -drive file=xv6.img,index=0,media=disk,format=raw -smp 2 -m 512 -S -gdb tcp::25000
|
gdb-client
cd /opt/xv6-public root@7c8d7a387d68:/opt/xv6-public# gdb GNU gdb (Ubuntu 7.7.1-0ubuntu5~14.04.2) 7.7.1 Copyright (C) 2014 Free Software Foundation, Inc. License GPLv3+: GNU GPL version 3 or later <http://gnu.org/licenses/gpl.html> This is free software: you are free to change and redistribute it. There is NO WARRANTY, to the extent permitted by law. Type "show copying" and "show warranty" for details. This GDB was configured as "x86_64-linux-gnu". Type "show configuration" for configuration details. For bug reporting instructions, please see: <http://www.gnu.org/software/gdb/bugs/>. Find the GDB manual and other documentation resources online at: <http://www.gnu.org/software/gdb/documentation/>. For help, type "help". Type "apropos word" to search for commands related to "word". warning: File "/opt/xv6-public/.gdbinit" auto-loading has been declined by your `auto-load safe-path' set to "$debugdir:$datadir/auto-load". To enable execution of this file add add-auto-load-safe-path /opt/xv6-public/.gdbinit line to your configuration file "/home/youji/.gdbinit". To completely disable this security protection add set auto-load safe-path / line to your configuration file "/home/youji/.gdbinit". For more information about this security protection see the "Auto-loading safe path" section in the GDB manual. E.g., run from the shell: info "(gdb)Auto-loading safe path" (gdb)
|
这里gdb有很长的一段输出,这里要特别注意,这里提示说需要添加一行内容到.gdbinit文件中去。
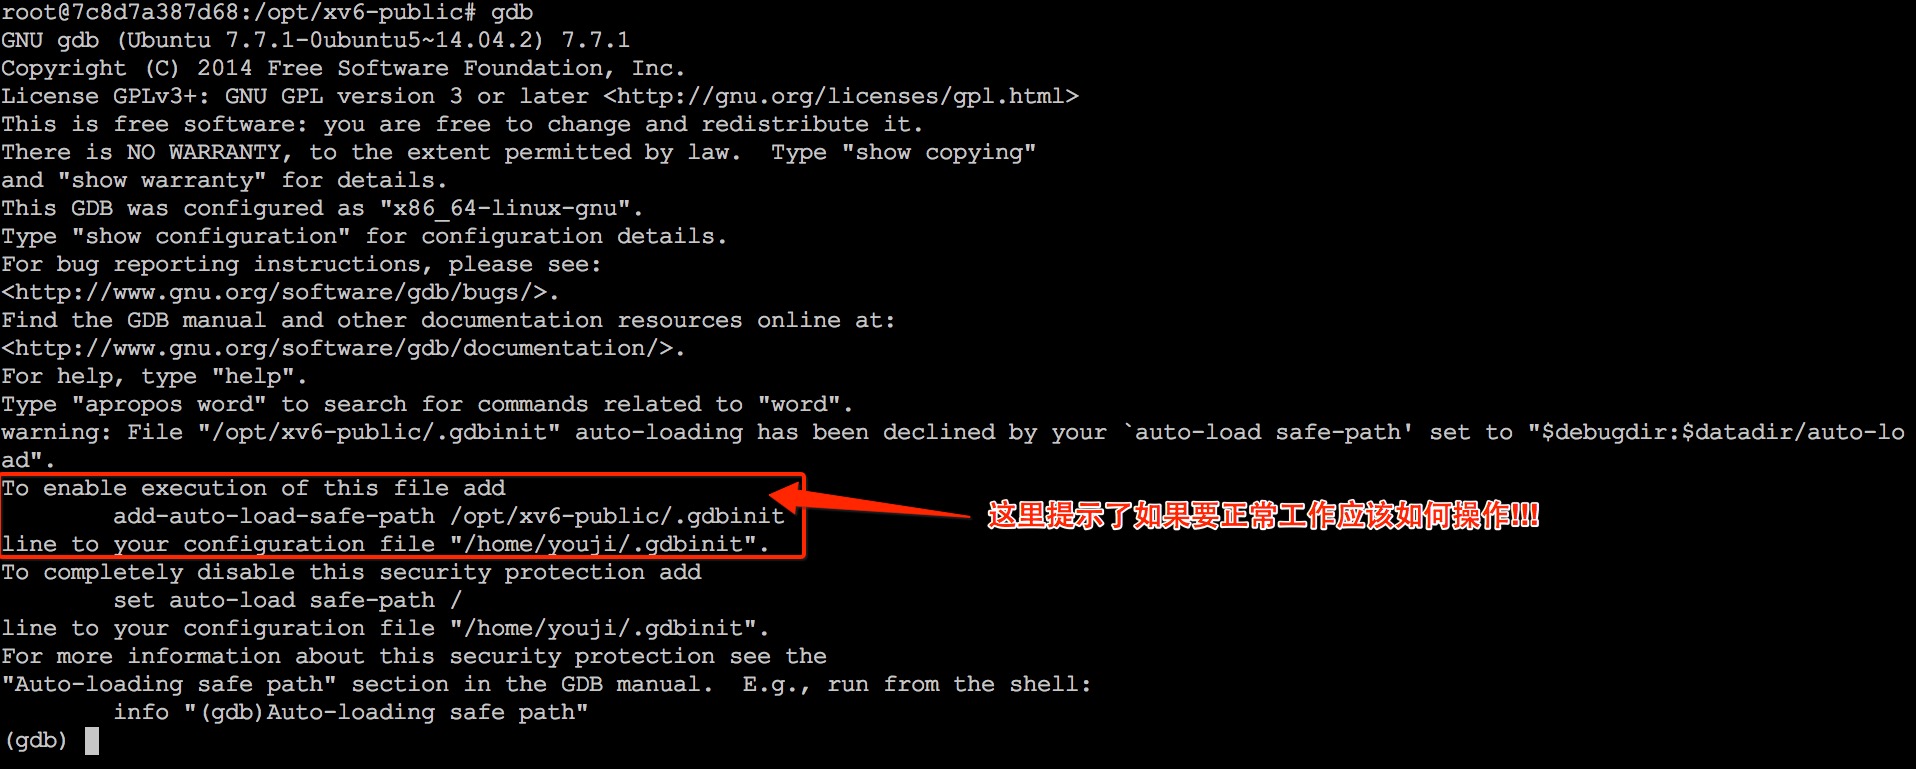
因此,这里需要参考红色框中的指令完成相应的设置:
mkdir -p /home/youji/ echo "add-auto-load-safe-path /opt/xv6-public/.gdbinit" >> /home/youji/.gdbinit
|
注意
- 这里需要将
youji改成自己的用户名。
- 运行gdb的时候,一定要在
/opt/xv6-public目录下。
运行成功之后,可以得到如下输出:
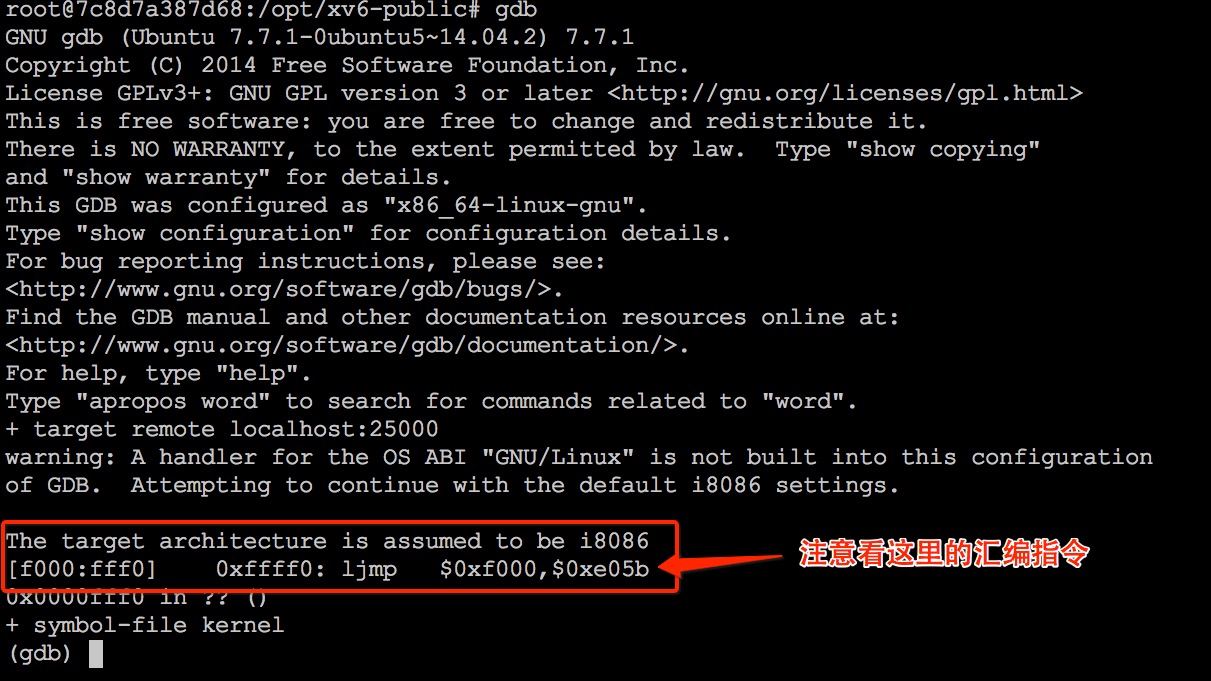
注意汇编指令。
调试
到这里开始,就已经可以调试了。先进行简单的调试。
(gdb) br * 0x7c00 <-- 在0x7c00处设置一个断点。 Breakpoint 1 at 0x7c00 (gdb) c <-- 让程序开始运行 Continuing. [ 0:7c00] => 0x7c00: cli
|
备注
- 在开始做JOS的实验之前,最好是可以读一下李忠的《x86汇编语言-从实模式到保护模式》这本书。否则汇编部分的代码看起来会比较累。
查看寄存器
当程序运行到0x7c00处之后,就开始进入到xv6的汇编代部分了。可以利用如下命令查看寄存器。
(gdb) info reg eax 0xaa55 43605 ecx 0x0 0 edx 0x80 128 ebx 0x0 0 esp 0x6f2c 0x6f2c ebp 0x0 0x0 esi 0x0 0 edi 0x0 0 eip 0x7c00 0x7c00 eflags 0x202 [ IF ] cs 0x0 0 ss 0x0 0 ds 0x0 0 es 0x0 0 fs 0x0 0 gs 0x0 0 (gdb)
|
可以看到,刚进入启动阶段的时候,cs:eip的值分别为:0:0x7c00。注意,这个时候还是处在实模式下。
单步执行
接下来就是可以单步执行了。由于在调试的时候,现在正在调试汇编语言,所以单步执行的命令会有所不同。
(gdb) si <-- 输入si表示单步指令,接下来会输出即将要执行(但是还不会执行的指令) [ 0:7c01] => 0x7c01: xor %ax,%ax <-- ax = 0 0x00007c01 in ?? () (gdb) info reg eax 0xaa55 43605 <-- 由于si并不会执行输出的指令,所以这里值还没有变成0. ecx 0x0 0 edx 0x80 128 ebx 0x0 0 esp 0x6f2c 0x6f2c ebp 0x0 0x0 esi 0x0 0 edi 0x0 0 eip 0x7c01 0x7c01 eflags 0x2 [ ] cs 0x0 0 ss 0x0 0 ds 0x0 0 es 0x0 0 fs 0x0 0 gs 0x0 0 (gdb) si <-- 执行前面的指令:xor %ax %ax。 [ 0:7c03] => 0x7c03: mov %ax,%ds <-- 即将要执行的指令。 0x00007c03 in ?? () (gdb) info reg eax 0x0 0 ecx 0x0 0 edx 0x80 128 ebx 0x0 0 esp 0x6f2c 0x6f2c ebp 0x0 0x0 esi 0x0 0 edi 0x0 0 eip 0x7c03 0x7c03 eflags 0x46 [ PF ZF ] cs 0x0 0 ss 0x0 0 ds 0x0 0 es 0x0 0 fs 0x0 0 gs 0x0 0 (gdb)
|